Welcome to Dyn’s Managed DNS Getting Started Guide!
Logging In
To log in to Managed DNS, you will need to create a DynID, if you don’t already have one.
Add Managed DNS to an existing DynID
Overview of Managed DNS
Dyn’s Managed DNS allows you to see and manage all of your DNS zones and hosts in the same interface. You can assign different users to manage individual zones, handle billing issues and questions, and administer your account.
Identifying Parts of the Interface
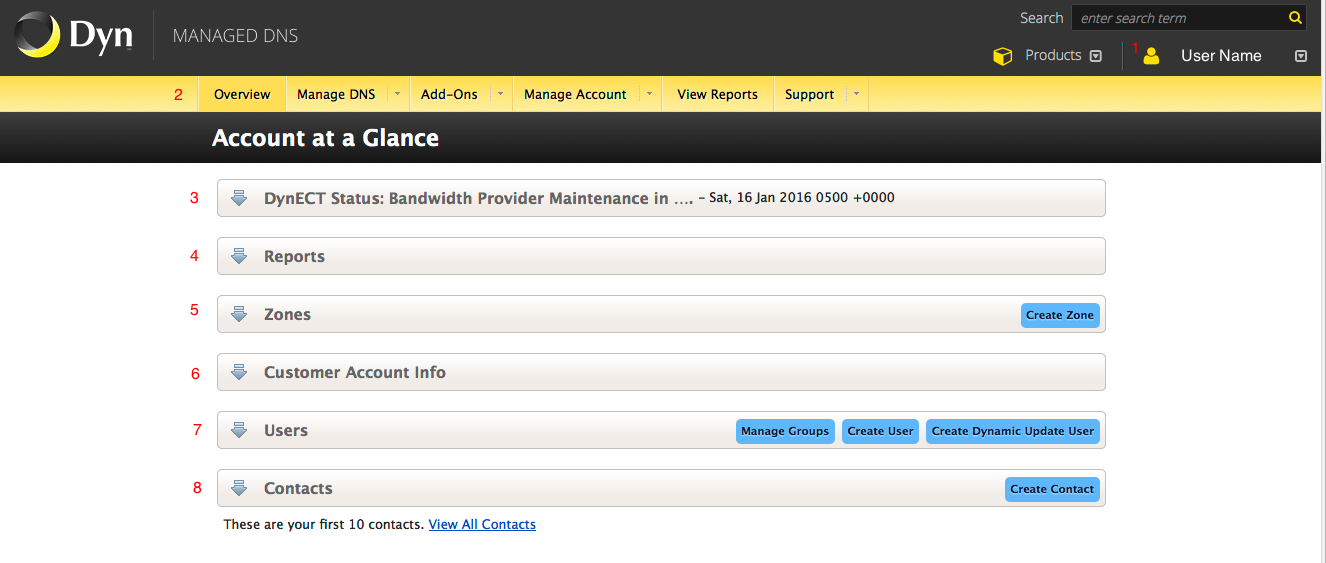
| Click on the graphic to enlarge the picture. | 1. Your user name. The DynID email address you used for login.
2. The menu bar. Each item in this bar opens its own menu. 3. Status Information. Expand the arrow on the left to see any status updates. 4. Available reports for your Managed DNS account. 5. Expand the arrow on the left to see your list of zones. 6. Your account information. Expand the arrow on the left to see your customer name, owner contact, nameservers, and other account information. 7. A list of all users on your account. Expand the arrow on the left to see the list. 8. A list of all contacts on your account. A contact is a person or group email address used for notifications. |
What do you want to do?
| Set up my first Managed DNS Zone. | There are several ways to set up zones on a new account. These instructions are for manually setting up your first zone directly in the Managed DNS interface. |
| Add Users to my account. | You can have one user as the billing and account administrator, or you can split those duties between two separate administrators. You can also have users that manage a single zone within your account. |
| Import a zone file. | A second way to set up zones in your new Managed DNS account. If you are migrating your managed DNS from another provider to your new Dyn Managed DNS account, you can download your zone information from your current provider and upload that file into your new Managed DNS account at Dyn. This will save you time, especially if you have many zones to add. |
| Transfer my DNS zones from another provider. | A third way to set up zones in your new Managed DNS account. If you already have your DNS managed at another managed DNS provider, you can transfer your zone information from that account to your new Managed DNS account at Dyn. |
| Set up Secondary DNS. | Having secondary DNS providers is a good safety precaution to ensure your DNS information can be provided in the event your primary managed DNS site is off-line. These instructions show you how to set up your Managed DNS account to act as the secondary DNS server when you already have a primary DNS server at another provider. |
| Upgrade from Standard DynDNS to Managed DNS. | Use these instructions to upgrade your Dyn Standard DynDNS account to your new Dyn Managed DNS account. |
| Create a Reverse DNS zone. | Having a reverse DNS zone is a good idea for email server accounts where the email may need to be traced back to its IP address of origin. Use these instructions to set up everything needed for reverse DNS. |
| Add Records to an existing zone. | Different types of resource records provide information for different types of DNS queries. Each record type has specific information you need to enter. Use this information to create the records you need. |
| Publish my zone. | In Dyn’s Managed DNS, any changes to a zone or creation of a new zone needs to be published in order for Managed DNS to use these new settings. |
| Test changes to DNS. | Information about tools you can use to test your DNS to ensure that your DNS changes have successfully propagated. |
| Delegate my zone. | Part of the zone creation process is to announce the location of the Authoritative Name Servers for your zones with your Internet Service Provider(ISP). This is called Delegation. These instructions give you the information you need to give your ISP to finalize the zone creation process. |
| Create a zone report. | Once your zones are created, you will want to keep a record of the zones you crated and how they are configured. These reports display the account zone information in several different ways. |

