Create a user who can manage or make changes to your Dyn Managed DNS account.
To Create a User
| There are 2 ways to access the Manage Users view within Dyn’s Managed DNS. | |
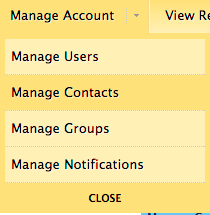
| 1. The first way is to click Manage Account, and then click Manage Users within the Manage Account view. |
|
| 2. The second way to access the Manage Users view is to select Manage Users from the drop-down menu by selecting the arrow to the right of Manage Account on the menu bar. |  |
| 3. Once you are on the Manage Users view, click Create User to open the Create User form. | |
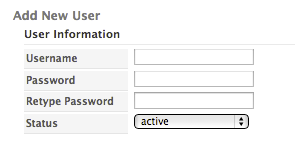
| 4. Add New User / User Information (required)
Configure the login credentials for the new DNS user. This login is used to enroll in DynID and for API authentication. Username: Valid characters are alpha-numeric (a-z, A-Z, 0-9) and the dash (-). Other special characters are not allowed. Password: Enter the password for this user. Retype Password: Re-enter the password for this user. Status: Select the status for this user. Active – The user can access the Managed DNS portal interface. Blocked – The user cannot access the Managed DNS interface. |
 |
| 5. Contact Information (required fields)
Used when configuring recipients for automatic notifications. Organization Name: Editable field auto-populated with the owner contact name. Contact Nickname: Enter an identifiable name for the user. It is how this user will appear in menus when configuring notification recipients. First Name: Enter the first name of the contact. Last Name: Enter the last name of the contact. Phone: Enter a phone number for this contact. It will only be used for authorized communication with the contact. Email: Enter an email account for this contact. It will only be used for authorized communication with the contact. Optional Fields |
 |
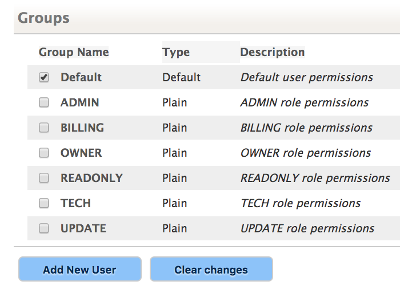
| 6. Groups
Select the permission group or groups where this user should belong. See Understanding Group Permissions for more information on the group types. Default – the basic permissions assigned to each new user. Admin / Billing / Owner / ReadOnly / Tech / Update – built-in permissions groups in Managed DNS. Other groups can be created for your individual needs. These groups are defined in Managed DNS by default. |
 |
| 7. Click Add New User or Clear Changes to finish your task. | |
Now that the user account is created in Managed DNS, the account needs to be attached to a DynID. Provide the user account information to the person who will use the account along with the following information to link the Managed DNS user to their DynID or to create a DynID.
Information Required to Setup a DynID:
Customer name – this can be found on your manage.dynect.net account in the Overview tab.
User account name and password you created in this process (step 4). The user account is used to create a DynID and for API authentication. DynIDs are only intended for human users.
See Setting Up DynID for the instructions on creating a DynID.
See How to Link a Product in DynID for instructions on adding Managed DNS to an existing DynID.

