Use External Nameservers to define nameservers outside of Dyn that you want to act as Secondary Nameservers.
These nameservers will receive notifications of changes to the Zone, and may issue Transfer Requests from the Dyn Nameservers. You can set external nameservers for all your account zones, or customize the external nameservers for one or more specific zones.
** On This Page:** - Directions to set External Nameservers for all Zones in Your Account - Directions to set External Nameservers for One Specific Zone - Best Practices
** Additional Resources** - Moving To Dyn: Configuring Your Current Provider To Allow Zone Transfers - Zone Transfer Issues - Creating a Secondary Zone - Modify a Secondary Zone - Blog: Dynect Platform And Amazon's Route 53 - Route 53 as a DNS secondary (setup document) - Route 53 as a DNS secondary (all files/scripts)
Directions to set External Nameservers for all Zones in Your Account
| 1. Click Overview within the Managed DNS application. | |
| 2. Scroll to the Customer Account Info section of the Overview page. |  |
| 3. Select Edit on the External Nameservers line. | |
| 4. Use the following information to complete the External Nameservers form.Service Default - Select Defaults Enabled or Defaults Disabled.Nameserver Addresses - Use the Host fields to enter the IP addresses of the Default External Nameservers you want to use for your account.Transfers - Allow this IP address to transfer zones away from Dyn.Notifies - Send a notification message to this IP when the zone is updated. NOTE: This will override the requirement for TSIG keys. To require TSIG for an IP address, the Transfers box must be left unchecked. Any IP with Transfers checked can do so without a TSIG key, even if the zone(s) have been TSIG configured.Click the "+" key to the right of the Host 1 IP address box to increase the available spaces for Nameservers.Click the "-" key to the right of the Host 2+ IP address boxes to remove that space. | 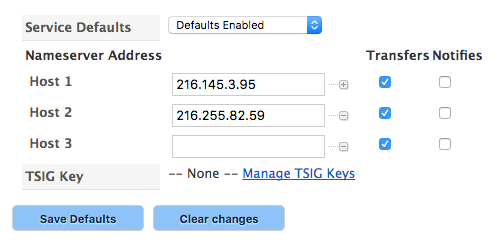 |
| Allow your servers to receive NOTIFIES from the following IP Addresses: | ||
| Server | Use For This Zone Type | IP Address |
| xfrout1.dynect.net | XFR Zones - IPv4 Address | 208.78.68.66 (Primary) |
| XFR Zones - Alternate Address | 204.13.249.66 | |
| XFR Zones - IPv6 Address | 2600:2003:0:1::66 (Primary) | |
| XFR Zones - IPv6 Alternate Address | 2600:2001:0:1::66 | |
| Note: Make sure that you enter the Primary IP address as the first server to receive notifies from and send transfer requests to. The Alternate address is an offline secondary source. | ||
| 5. Save Defaults to set the Default External Nameservers or Reset to clear the form. | ||
Directions to set External Nameservers for One Specific Zone
| 1. Click Overview or Manage DNS. | |
| 2. Find the Zone where you want to setup secondary nameservers outside of Dyn. |  |
| 3. Click Manage for that Zone in the right most column. | |
| 4. Click Zone Options. | |
| 5. Click the General tab or make sure it's already the focus. | |
| 6. Use the following information to complete the External Nameservers form.Account Default Servers -- Click to use the default servers for your account.Click Edit on the right of this field to access the Default External Nameservers edit view.Custom External Servers -- Click to specify the External Nameservers for this zone, if they are different from the Account Default Servers.Click the + key to the right of the Host 1 IP address box to increase the available spaces for Nameservers.Click the - key to the right of the Host 2+ IP address boxes to remove that space.Disable External Servers -- Click to disable the External Nameservers. |  |
Note: Make sure that you enter the Primary IP address as the first server to receive notifies from and send transfer requests to. The Alternate address is an offline secondary source. | |
| 7. Click Reset to clear the form, or click Save Settings. | |
Best Practices
If you are using a secondary DNS provider or external nameservers for redundancy, it is a best practice to include your secondary provider's NS records at the apex of the zone that resides with your primary DNS provider. This will ensure both providers are considered authoritative and will allow the secondary DNS provider to serve DNS records in the case of an outage with your primary provider. This will also allow your secondary DNS nameservers to be cached resulting in better performance.
To learn more about NS record, see Zone Records: NS.
To learn more about how to add records to an existing zone, see Adding Records to Your Zone.
Next Step: Publishing Your Zone »