Use these instructions to Update or Modify a Secondary Zone in Dyn’s Managed DNS.
In order to maintain zone records, your user should have the related permissions listed in the Zones & Records permissions section of the User and Group Permissions documentation.
Learn more about DNS Zones »

Note: Make sure that you enter the Primary IP address as the first server to send notifies to and receive transfer requests from. The Alternate address is an offline secondary source.
| 1. Click Overview or Manage DNS |
 |
| 2. Click Manage in the far right column for the secondary zone you want to update. |
 |
| 3. Click Simple Editor on the menu bar. |
 |
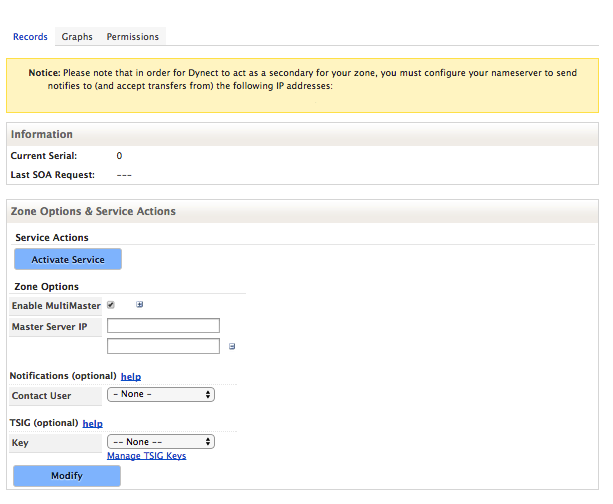
| 4. Use the Records view to update information for the secondary zone.
Current Serial: Current serial number for this secondary zone. Not Editable.
Last SOA Request: The last date/time the Secondary Zone tried (successfully or unsuccessfully) to get SOA information from the Primary Zone. Not Editable.
Activate Service: Click to activate the Secondary Zone service, if it is not already activated.
The Refresh Zone Data and Deactivate Service buttons appear in the interface where the Activate Service button displays on the right.
Refresh Zone Data: Click to refresh the zone data, if needed.
Deactivate Service: Click to deactivate the Secondary Zone service.

Enable MultiMaster — Click to enable the form to accept more than one IP address. Use in the case of multiple Primary Zone servers.
Master Server IP — Enter the IP address of your Primary Zone Server. If there is more than one Primary Zone Server, select Enable MultiMaster and enter one IP address per line.
Click for More Info on Optional Fields
Notifications (optional) — We will monitor your master server and if we are unable to transfer zone data from your master server, we will notify your Contact.
Select the Contact from the drop-down list.
TSIG (optional) — Use this section to assign Transaction Signature key(s) to your transfer requests to the Primary Zone server. Click help to view more information.
Key — Select already created TSIG keys from the drop-down list, or click Manage TSIG Keys to add keys, if needed.
|
 |
| 5. Click Modify to save the changes to your secondary zone. |
 |
« DNS Knowledge Base


