Learn more about DNS Zones »
Use these instructions to set up a Secondary Zone in Dyn’s Managed DNS for a Primary hosted by another platform.
To edit or modify an existing Secondary Zone, see Modify a Secondary Zone.
On a Managed DNS zone where Dyn is the primary and another platform is secondary, see External Nameservers for more information.
Note: In order for Dynect to act as a secondary for your zone, you must configure your nameserver to send notifies to (and accept transfer requests from) the following IP addresses: 208.78.68.65 (primary), 204.13.249.65 (offline backup), 2600:2001:0:1::65 (primary), 2600:2003:0:1::65 (offline backup).
Note: Make sure that you enter the Primary IP address as the first server to send notifies to and receive transfer requests from. The Alternate address is an offline secondary source.
| 1. Click Overview or Manage DNS. |
 |
| 2. Click Create Zone. |
 |
| 3. Click Create Secondary Zone tab to display the form. |
 |
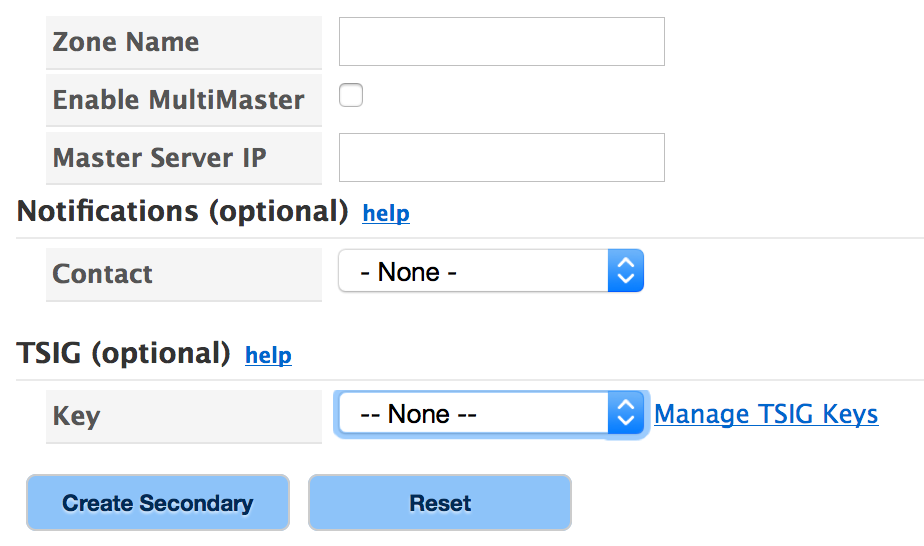
| 4. Use the following information to complete the form.
Zone Name – Enter the domain name of the zone.
Enable MultiMaster – Click to enable the form to accept more than one IP address. Use in the case of multiple Primary Zone servers.
Master Server IP – Enter the IP address of your Primary Zone Server. If there is more than one Primary Zone Server, select Enable MultiMaster and enter one IP address per line.
Click for More Info on Optional Fields
Notifications (optional) – We will monitor your master server and if we are unable to transfer zone data from your master server, we will notify your Contact.
Select the Contact from the drop-down list.
TSIG (optional) – Use this section to assign Transaction Signature key(s) to your transfer requests to the Primary Zone server. Click help to view more information.
Key – Select already created TSIG keys from the drop-down list, or click Manage TSIG Keys to add keys, if needed.
Create Secondary/Reset – Click Reset to clear all fields or Create Secondary. |
 |
|
Note: It is important to add your secondary nameservers (found on your account Overview page) to the apex of your primary zone at your primary DNS provider. This creates a proper parent/child delegation match so that your top level domain and your primary authoritative nameserver(s) will always have the same information.
|
Third-Party Hidden Master Configuration
A third-party hidden master configuration allows you to keep your primary DNS nameserver or provider from appearing on your delegation list or DNS queries. Updates to records are made to the primary zone using established tools and practices and the primary service automatically updates the secondary service. Only the distributed edge of the secondary service takes traffic in this configuration. This setup provides additional security because only supplementary DNS service is visible outside the network. Use these instructions to configure a third-party hidden master setup at Dyn.
- Follow the steps above to create a secondary zone in Dyn’s Managed DNS.
- Add your Dyn assigned NS records to your DNS configuration at your primary provider.
- Delegate your domain registration to your Dyn Managed DNS nameservers. For more information, see Delegate Your Domain With Different Registrars (Managed DNS).
- Remove the primary nameservers from the delegation list and the primary NS records from your primary zone.
After completing the steps above, your primary zone will continue pushing updates to Dyn’s secondary server; however, the master server will no longer be visible. Only Dyn’s Managed DNS will provide responses and be visible on queries.
Next Step: Publishing Your Zone »
« DNS Knowledge Base

