The Bulk Add feature is designed to assist you in adding a large amount of records to your zone without the need to enter them one at a time. The Bulk Add view does not contain a field to identify the zone where the records will be added. This is due to the fact that you are already managing the zone where the records will be appended.
The Bulk Add feature cannot be used to change or remove items from the zone. It is only designed to append items to the zone.
Append Records To The Zone Using The Bulk Add Feature
| 1. Click Overview or Manage DNS. | |
| 2. Click Manage in the far right column for the zone you want to change. | |
| 3. Click the down arrow next to Simple Editor on the menu bar and select Bulk Add from the drop-down menu. |  |
| You can choose to append the zone by either uploading a file or entering the zone information to be appended. Both methods are explained here. | |
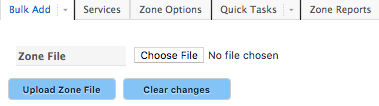
| 4. Append the zone with the new records using the fields at the top of the Bulk Add view.
Zone File – Click the Choose File button to open a search for the file where the new zone record information is located. NOTE: Ensure that the contents of the file are in BIND or Tinydns format. Upload Zone File/Clear changes – Click Clear changes to clear all fields or Upload Zone File. |
 |
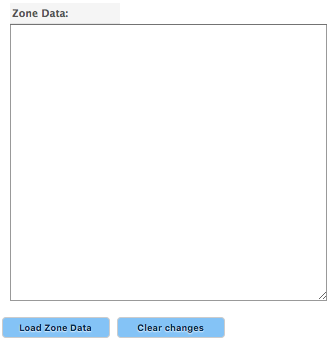
| 5. Append the zone with the new records by entering the information directly into the Bulk Add form.
Empty Square – Paste the contents of the Zone File into the empty square on the form. This is a free-form text field. NOTE: Ensure that the contents of the Zone File are in BIND or Tinydns format. Load Zone Data/Reset – Select Clear changes to clear all fields or Load Zone Data. |
 |