Learn more about DNS Zones »
The IP Tracking service automatically populates a reverse DNS zone with matching PTR records for specific record types created in the identified forward zones.
For Example: You place IP Tracking on reverse DNS zone 3.2.1.in-addr.arpa and request it track A records for the zone dnsrocks.org. When you create a record on dnsrocks.org for the mail server mail.dnsrocks.org, IP Tracking will automatically create a PTR record in the reverse DNS zone 4.3.2.1.in-addr.arpa for mail.dnsrocks.org where 1.2.3.4 is the IP for mail.dnsrocks.org.
Setting Up IP Tracking
| 1. Click Overview or Manage DNS. |
 |
| 2. Click Manage in the far right column for the root reverse DNS zone where you want IP Tracking PTR records to be created.
NOTE: It is very important that you create the IP Tracking at the root of the reverse DNS zone. Example: 3.2.1.in-addr.arpa |
 |
| 3. Select Simple Editor from the tab menu. |
 |
| 4. Scroll to the Services section. |
 |
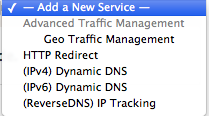
| 5. Select (ReverseDNS) IP Tracking from the Add a New Service drop-down.
Use steps 6, 7, & 8 to complete the IP Tracking form when it appears. |
 |
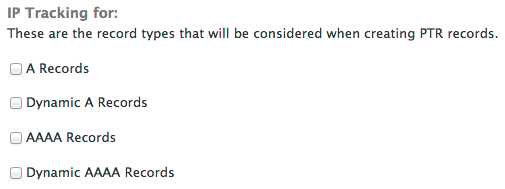
| 6. IP Tracking for: Select the record type(s) to be tracked. Any time a tracked record type is modified or added, the PTR records in the reverse zone are modified to match. |
 |
| 7. Under: Enter the zone, node, or domain you want to monitor.
For example: If you want IP addresses in dnsrocks.org to have matching reverse DNS, you enter dnsrocks.org to this list.
NOTE: IP Tracking will automatically create the reverse record for any current records in the zone once the service is added in step 9. |
 |
| 8. Attributes: Set the TTL (time to live) and Netmask parameters here.
TTL: Select the TTL for the PTR records IP Tracking creates.
- Default – The TTL for the PTR records will be inherited from the SOA of this zone.
- Match Record – Each PTR record created will have the same TTL as its corresponding tracked record.
Netmask: Set the netmask to match the reverse zone selected in step 2. The netmask must be entered in CIDR-style. For example: 17.23.0.0/16
NOTE: It is very important that the netmask entered here matches the netmask for the zone. |
 |
| 9. Select Add IP Tracking to establish IP Tracking on the zone(s) or node(s) indicated. |
 |
« Return to the DNS Knowledge Base

