Managing Dynamic Updates
The easiest way to create an Update User is to create it when you add the Dynamic DNS service using the Quick Task: Create Dynamic DNS Host. If you need to create an Update User outside of the Quick Task process, use these directions to access the correct location.
To Create an Update User
| 1. Select the Manage Account tab. |
 |
| 2. Click Manage Users. |
|
| 3. Click Create Dynamic Update User. |
 |
| 4. Use the following information to create the Update User:
NOTE: If you do not supply a nickname or password, Dyn’s Managed DNS will create them for you.
Nickname: Enter the nickname for this user.
Password: Enter the password for this user.
Retype Password: Re-enter the password for the user.
Create Dynamic User: Creates the Update User account. |
 |
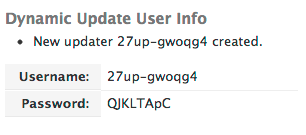
| 5. The system will return with the username and password for your new Dynamic Update user. |
 |
| NOTE: The system appends a random 6-character identifier to the beginning of the Update User name. These 6 characters are unique to your customer account and are the same for all Update User names created in any zone on the account. |
<< DNS Knowledge Base


