If you are migrating your Dynamic DNS (DDNS) zones from Dyn’s Standard DNS to Managed DNS Express, you will need to follow these steps to successfully transfer your zones and reconnect them to your hostname.
Watch this video for a tutorial on how to migrate your DDNS zones from Standard DNS to Managed DNS Express.
Migrate Your Zone From Standard DNS to Managed DNS Express
| 1. From the Managed DNS portal, click Overview. | |
| 2. Click Create Zone. | |
| 3. Click the Migrate tab. | |
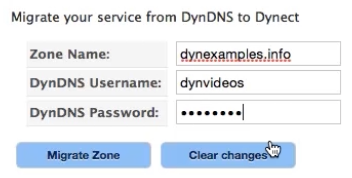
| 4. Enter your zone’s name (domain name) and your Dyn Standard DNS credentials, then click Migrate Zone. |
|
| 5. Your zone will be transferred but not yet published to Dyn’s servers. Click the Task Poller button to view the status of your transfer. | |
| 6. Once your zone is transferred, you will be brought to the Zone Editor screen. Review that your zone was transferred correctly. |
Recreating Dynamic DNS in Your Zone
When you migrate your Dynamic DNS (DDNS) zones from Standard DNS, it only captures the current A records within the zone. Think of it as a snapshot of your device’s current, public IP address. This means that when the dynamic IP address of your device changes, these A records will no longer be valid and you will not be able to connect to your device from your hostname.
Follow these steps to re-establish the link between Dyn and your update client.
| 1. Delete any A records in your zone by clicking the down arrow beside them and clicking the Delete button. | |
| 2. Click the arrow beside Quick Tasks and select Create Dynamic DNS. | |
| 3. Type in the hostname of one of your DDNS nodes (subdomains) and the IP address “1.1.1.1”.
NOTE: This IP address will automatically be corrected when the link is re-established between Dyn and your DDNS update client. |
|
| 4. In the Dynamic Update User Information section, create a new username and password for your update client, or use the existing credentials of a DDNS user you have already created in Managed DNS. | 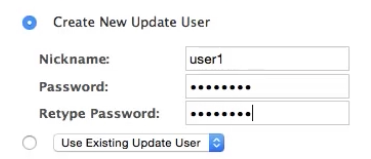 |
| 5. Click Create DDNS Host. | |
| 6. The dynamic hostname will be created and you will presented with the new credentials to connect your update client to Dyn.
NOTE: Dyn’s system appends a prefix number to the beginning of each DDNS username. This is to help identify the DDNS usernames assigned to your account. |
|
| 7. Click Review Changes and Publish. | |
| 8. Click Publish Zone.
NOTE: For your dynamic hostnames to function, you will need to ensure that your domain has been successfully delegated to Dyn’s nameservers. Refer to this guide on how to delegate your domain with your registrar. |
|